How to Grow Daylilies

How To Plant, Grow and Care For Daylilies
| Botanical Name | Hemerocallis |
| Plant Type | Perennial |
| Sun Exposure | Full sun, partial shade |
| Soil Type | Well-drained loamy, sandy or clay |
| Soil pH | Slightly acidic to neutral |
| Bloom Time | Summer |
| Flower Color | Yellow, red, pink, purple and orange hues |
| Hardiness Zones | 3-9 |
| Special Features | Low-maintenance perennials are drought-tolerant and can grow in less-than-ideal growing conditions. |
Cheerful and easy-care, daylilies are a must-have perennial in gardens and landscapes. These easily recognizable plants feature grass-like foliage and trumpet-shaped flowers that open above the foliage. Thanks to modern breeding efforts, hundreds of daylily varieties are available in a variety of flower colors and forms.
Daylilies get their name from their flowers—each bloom only lasts for a day. However, because each stem has multiple buds, the plants put on a flower show for weeks. By planting early season, mid-season and late-season varieties as well as reblooming daylilies, you can extend the daylily season throughout the summer months.
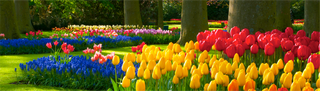
Daylilies are favorites for planting along walkways and edging flower beds. They're impressive when planted en masse and often planted on hillsides. These classic perennials can also be planted in mixed perennial beds. Here are some tips for when to plant daylilies.

How to Plant Daylilies
The two most important factors on how to plant daylily roots are giving them the right soil and giving them enough space. Daylilies grow best in well-drained soil and don't like to be waterlogged. You can improve the soil's structure and drainage by mixing compost or aged manure into the soil. While daylilies aren't heavy feeders, they benefit from an all-natural, slow-release fertilizer, such as Van Bourgondien 100% Natural Perennial Food.How deep to plant daylilies depends on the size of the plant. Dig a hole deep enough to accommodate the roots without bending them. The roots should be just below the soil surface with the crown at the soil level. Space the plants 18-24" apart. Water thoroughly after planting.
If you are planting daylily roots in the fall in an area that experiences winter freezes, then mulch around the plant to prevent heaving over winter. Mulch also helps suppress weeds and retains moisture in the soil.
When to Plant Daylily Bulbs
The best time to plant daylilies is in late spring or early fall. If you're willing to give them a little extra care and watering, daylilies can also be planted in the summer. Daylilies are either planted as bareroots or potted plants. If planting bareroots in the spring, they may not put on much of a flower show that first year but will in the following years.
Where to Plant Daylilies
Daylily roots can be grown in many parts of the United States and will grow in zones 3-9. You can find your grow zone using our zone finder. Daylilies are sun lovers and grow best in full sun to partial shade. They should receive at least 4-6 hours of direct sunlight daily. Daylilies are excellent for mixed perennial gardens, edging walkways, borders and grown in masses.
How to Grow Daylilies
Daylilies are very low-maintenance perennials. There are just a few tips for how to care for daylilies after planting.
During the first year after planting daylily roots, daylilies need about 1 inch of rainfall weekly, or the equivalent, throughout the growing season. Once the plants are established, they are drought tolerant. However, if they experience a dry spell of 3-4 weeks, they should be watered. Mulching around the daylily plants is recommended. Daylilies may be lightly fertilized with a slow-release fertilizer in the spring. This is also a good time to add some compost around the plants.
When to Cut Back Daylilies
While you don't need to remove spent blooms, deadheading makes the plants look tidier and encourages more blooming. Once the entire scape has blossomed, it can be cut to the ground. If you leave it standing, then remove it before early spring.
When to Divide Daylilies
Daylilies are propagated through division, and the plants can be divided every 3-5 years. The best time to divide daylilies is in early fall, after the plant has completed blooming. Simply dig up the plant and remove the soil from around the roots. Break the plant into 3-4 clumps. Each clump should have several leaves and roots. After dividing, cut the leaves back to about 6" tall and replant as soon as possible. This should be completed at least six weeks before a freeze, as the plants need time to become established before winter.
Daylily Pests & Diseases
While daylilies are relatively trouble free, insects such as aphids, thrips and mites may bother them. Monitor your daylily plants for signs of insect damage.
Daylilies are adaptable to a range of conditions, winter hardy and very low-maintenance perennials. Just take care to plant them in a sunny location with well-drained soil and water them until they become established. They fit into many gardening styles—and can even be used as ground cover.
Daylily FAQs
How Do You Transplant Daylilies?
Transplant daylilies after dividing them in late summer or early fall. Dig a hole large enough to accommodate the roots. The crown should be at surface level. Water thoroughly after planting.What To Do With Daylilies After They Bloom
The faded flowers can be snipped off and removed or left on the plant. After all buds on the scape have bloomed, the entire scape can be cut.How Do You Prune Daylilies?
While daylilies don't require pruning, you can remove the flower scape after all the buds have bloomed.How to Prepare Daylilies For Winter
Newly planted daylilies benefit from mulching over winter. While most daylilies go dormant over the winter, varieties with evergreen foliage are susceptible to frost damage and benefit from mulching.How Tall do Daylilies Get?
While dwarf daylilies often grow 18-24" tall, other varieties can grow 24-48" tall, depending on the variety.Varieties of Daylilies
The hardest thing about growing daylilies is often choosing which ones to grow. With hundreds of varieties available, it can be challenging to pick a few favorites. A few popular varieties include:

Stella d'Oro: Loved by generations of gardeners, this popular yellow daylily starts blooming in June and keeps reblooming until fall. A dwarf variety, it's a favorite among landscapers and often planted in masses or along walkways.

Moussaka: Prolific rebloomer bears more than 250 dramatic blooms within its third year. The 6" creamy yellow flowers are accented with maroon-red eye zones and matching maroon rubbles. It adds eye-popping color to mixed borders and containers.

Wild Horses: Reblooming daylily features a very showy flower pattern. The creamy-yellow flowers have a slight pink tint and maroon centers and yellow throats. Whether massed or planted in mixed perennial beds, it's sure to get noticed.
Have another question? Return to the Customer Service Help page or send an e-mail directly to Customer Service